In Dr. Montessori’s day, children were made to practice forming letters by first writing an almost endless series of vertical strokes. Montessori immediately saw that this method completely ignored the fact that so many of the letters in our alphabet are based on curves (think about ‘o’, ‘c’, ‘b’, etc.). The work being given to public school children was tiresome and unnecessary and left most people with the mistaken conclusion that mastering reading and writing was a task requiring huge effort on the part of the child.
When Dr. Montessori developed her sandpaper letters, she was delighted to discover that small children could absorb these skills with great ease and pleasure. Her moment of revelation came in realizing she only needed to let children touch, with their fingers, the letters of the alphabet, for them to start comprehending exactly how each letter is formed. This is really an exercise in observing design, and children enjoy getting to feel the slightly rough surface of basic Montessori sandpaper letters.
How to use the sandpaper letters
In the classroom or homeschool environment, you can begin by offering the child a selection of three letters. Present one of the letters first, and demonstrate tracing the letter with two fingers while you say the sound of that letter. It’s important to make a distinction between the names of the letters and their sounds. Rather than saying, “This is B”, you want to give the sound of the letter, as in, “buh”.
After your demonstration, let the child trace the letter several times while they pronounce its sound. After several repetitions, give the second letter with its spoken sound, and so onto the third. Finally, set all three letters before the child and let them trace and verbalize each one if they can. Make a record of which letters or sounds have been perfected so that you can keep track of their progress.
Many instructors advise making sure that all of the vowels are among the first 1/2 of the letters given to a child in this way. When we learn vowels, we are well on our way to having the tools we need to form words. The above work will enable the children not only to master recognition of the forms and sounds of each letter, but the act of tracing with the fingers puts them just one step away from being able to reproduce those tracings with a writing implement!
Further exercises with letters
The North American Montessori Center makes some good suggestions for promoting further confidence with the designs of the alphabet. For example, allow the child to take the sandpaper letters over to a tray of cornmeal where he can trace the forms right into the grain. Or, let the children form the letters out of dough or clay. A nice group activity involves letting a small group of children who have been introduced to the same number of letters play a game that is rather like Concentration. Let them put the letter cards upside down on a mat. In turn, each child knocks on the back of a card, saying, “Knock-knock. Who’s there?”. When the letter is turned upright, the child identifies the sound of the letter that appears.
If your progress chart indicates that the child is feeling confident about some letters but not others, it’s time to go back to the original demonstration of those letters for review and more practice.
What sandpaper letters should look like
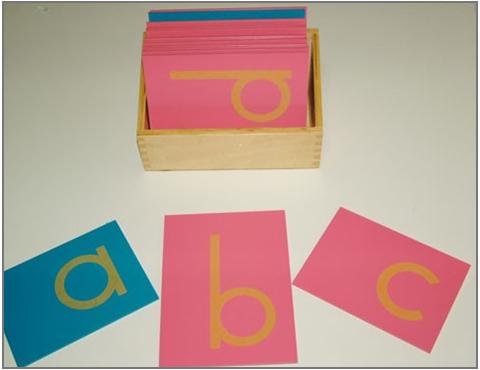 The letters should be cut of finest grade sandpaper, and care should be taken, if you are making them yourself, that the letters are accurately shaped. Each letter is then securely glued to a hard cardboard card. Generally, consonants are mounted on pink cards and the vowels on blue ones. (Photo courtesy Alison’s Montessori.)
There remains an interesting debate within the Montessori community as to whether it is better to offer print or cursive-style letters first. This may vary given your own experience or preferences. Whether you start with printing or cursive, most Montessori instructors do agree that the lower case letters should be given before capital letters.
Important notes
- Be sure you are letting each child set his or her own pace.
- Do not overwhelm the child by presenting too many letters at once, and be careful not to shame the child if they fail to correctly identify a letter. Simply set that letter aside to be re-demonstrated later.
- If you are making the letters yourself, make sure the sandpaper you are using is the finest grade and that the child is reminded to trace lightly. Rubbing your finger roughly against coarse sandpaper hurts!
- Get a sturdy box or tray to keep your letters tidy, organized, and all in one place. Designate a place on a low shelf or in a cupboard for the box. Make sure the child knows where the box is located.
The sandpaper letters are truly one of the most innovative Montessori materials. They are the key to unlocking the wonderful world of words. Sandpaper letters put the skill of reading and writing at the child’s fingertips – literally!