As I mentioned last week, I believe that every Montessori classroom should have a dedicated art area. This lets kids know that art is important, and also gives them a chance to explore different kinds of art and different art media. In elementary, projects can be more sophisticated, especially if kids have had a good foundation in the basic art skills.
Some possible elementary art activities:
Painting of every kind: watercolor, tempera, acrylics on canvas
Drawing and sketching: still life (flowers, fruit), portraits, landscapes
Varied art media: colored pencils, oil pastels, crayons, clay, and charcoal
Here’s an example of an elementary art area; I set this up in my home but it’s very similar to the one I had in the classroom:
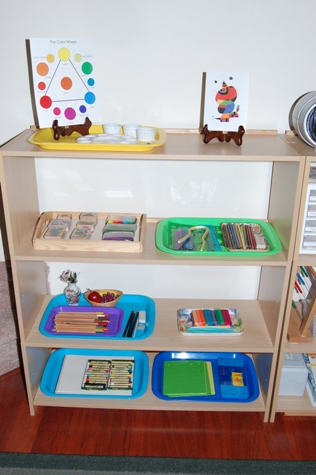
I’m going to take this shelf by shelf, and talk about each material.
Shelf 1:
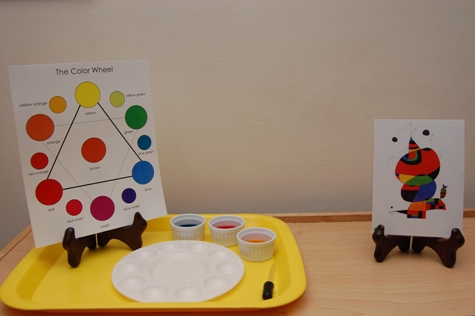
This shelf contains a color mixing work similar to the one you’d find in preschool, only now an additional component – the color chart – has been added. I was delighted to discover that a plastic paint tray (found at any craft or art store) has almost the same amount of circles as the color chart (I think it’s got one less). Kids have a great time putting primary-colored water into three of the circles, and then using those colors to make all the other ones on the chart.
The picture is a postcard of a painting by Miro in the abstract style. It’s long been a tradition to put out real paintings in the Montessori classroom for children to copy. Set one near an easel, with the appropriate colors of paint, and kids do a surprisingly good job of copying the paintings. This can be done in preschool, too, I just didn’t have enough room on the preschool shelf to show one.
Some people feel that copying paintings stifles a child’s own creativity. I haven’t found that to be true; copying paintings is a great way to learn about technique, shading, color, and light. If the child has other opportunities to express their own creativity, they will in no way be stifled. Actually, copying paintings of the masters has long been a part of artistic studies for adults as well.
Shelf 2:
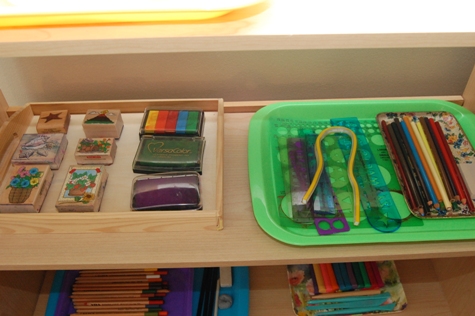
On the left, there’s a tray with stamp pads and stamps. This is a fun activity that can be done by preschoolers too. I like to give preschoolers simpler stamps, and elementary kids more elaborate designs that can be colored in with colored pencils after stamping.
On the right is an assortment of rulers and stencils. These were all found (including the bendable ruler) at an office supply store. Kids can use them to experiment with shapes, and draw all sorts of creative pictures with overlapping shapes. You could actually put a tray like this in the geometry area for use with the geometry folders and wooden materials.
Shelf 3:
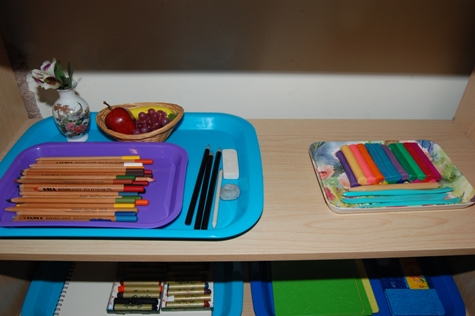
On the left, you’ll find a still life drawing work. I like to put out simple objects – in this case, a vase and bowl of fruit – and let kids draw them. The drawings can be done in black and white or with colored pencils. You can show the child how to look at the object and follow its shape on the paper. I find that to be a very good way to get started with sketching.
On the right is a tray with different colors of non-hardening modeling clay, along with some clay tools. Not only is this a fun art activity, but there are many places to use the clay throughout the classroom. Animals can be molded after doing zoology nomenclature cards or animal research.
Land and water forms can be created after doing basic or advanced land and water forms cards. Biomes can be made with clay as well. If the child desires to preserve their clay sculptures, it’s best to use a hardening clay like Sculpey, or other type of craft clay that can be baked.
Shelf 4:
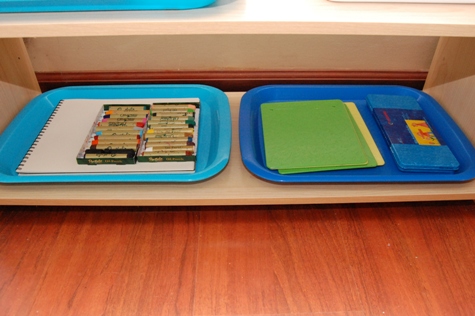
This shelf contains oil pastels with art paper on the left. Oil pastels (sometimes called cray-pas) are a fantastic art medium. Colors can be blended with a fingertip or brush; water can be added to blend and soften. Colors are easy to layer, especially for that time-honored favorite: first, color all over a piece of paper with different colors, then color over that layer with black. Unbend a paper clip and use the point to trace colorful pictures through the black layer.
On the right are some textured plates for rubbing. I found these in the scrapbook aisle at Target. They have a variety of textures (one on each side), and work well with Stockmar Beeswax crayons, which are flat and rectangular and perfect for rubbings. All manner of things work well for rubbings, including leaves, coins, and paper clips.
My philosophy was to treat the art shelf like any other area of the classroom – children were free to choose the work throughout the day, working alone or in pairs. If you put out something really exciting, be prepared to limit them to using it one time a day so everyone gets a turn.
Sometimes art instruction can be intimidating for adults, especially if they’ve never thought of themselves as particularly artistic. I’ve found that the best approach is to dive right in and learn alongside the students. When I wanted to do acrylic painting on canvas with my son, for instance, I bought a book about it and bought two canvases – one for him and one for me. We learned together – and had a great time.

